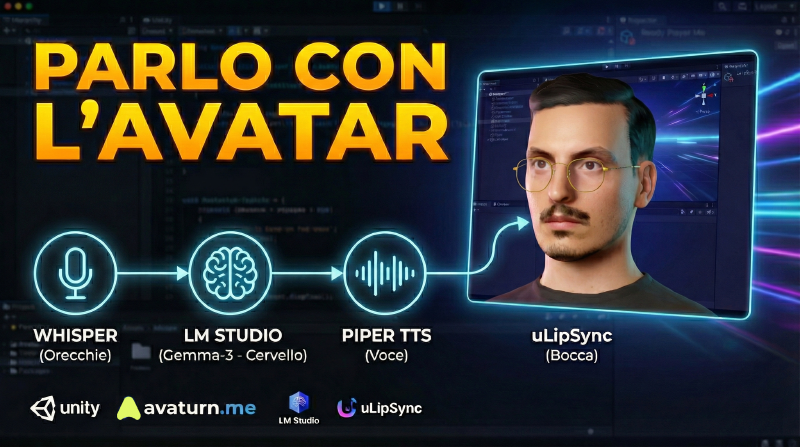
Introduzione In questa guida, creo un piccolo progetto Unity dove un avatar ascolta, ragiona e risponde vocalmente, il tutto in locale sul proprio pc, senza api di terze parti o strumenti a pagamento.
Tech Stack:
Cervello: LM Studio (Gemma-3 o Mistral)Corpo: Avaturn (Modello 3D) + Mixamo per le Animazioni (facoltativo)Voce: Piper TTS (Text-to-Speech locale neurale)Orecchie: Whisper (Speech-to-Text locale)Labbra: uLipSync (Lip Sync in tempo reale)Engine: UnityFASE 1: Il Cervello (LM Studio) Configuriamo il Server LLM locale che riceverà il testo e genererà la risposta.
Download: Scarica e installa LM Studio .
Modello:
Cerca gemma-3-4b-it (o mistral-7b-instruct versione GGUF). Scarica la quantizzazione Q4_K_M (miglior compromesso qualità/velocità). Server Locale:
Vai nella scheda Developer (icona <-> a sinistra). Seleziona il modello scaricato in alto. Imposta Context Length a 2048 . IMPORTANTE: Spunta CORS (Cross-Origin Resource Sharing) su “On”.Clicca Start Server . Verifica l’URL (dovrebbe essere: http://localhost:1234). FASE 2: La Voce (Piper TTS Server) Configuriamo il server Python per la generazione vocale neurale (sostituisce la voce robotica di Windows).
Installazione dipendenze:
1
python3 -m pip install piper-tts[ http]
Download Voce Italiana:
1
python3 -m piper.download_voices it_IT-riccardo-x_low
Avvio Server:
Lancia questo comando nel terminale e tienilo aperto:
1
python3 -m piper.http_server -m it_IT-riccardo-x_low
Il server girerà su http://localhost:5000.
FASE 3: Setup Unity (Plugins) Importa o scarica ed installa i seguenti pacchetti via Package Manager > Add package from git URL :
Whisper (Orecchie):
https://github.com/Macoron/whisper.unity.git?path=/Packages/com.whisper.unity
uLipSync (Bocca):
https://github.com/hecomi/uLipSync.git
UnityGLTF:
https://github.com/hecomi/uLipSync Download and install manually
Questo pacchetto servirà per il supporto completo per il file GLB di Ava
FASE 4: Il Corpo (Avaturn & Animazioni) Nota: Ready Player Me non è più utilizzato a causa della chiusura dei servizi SDK prevista per Gennaio 2025.
A. Creazione Avatar (Avaturn) Vai su avaturn.me , crea l’avatar da un selfie.
Export: Scarica in formato .glb .
Import in Unity: Trascina il .glb in Unity (Assets).
B. Setup del Rig (Fondamentale) Seleziona il file .glb dell’avatar in Unity.
Nell’Inspector, scheda Animation > Animation Type : cambia da Mecanim a Mecanim Humanoid
Clicca Apply .
C. Animator Controller Crea un Animator Controller (“AvatarAnimator”).
Aggiungi parametro Bool IsTalking.
Crea transizioni:
Idle -> Talking (Condition: IsTalking = true, togli “Has Exit Time”).
Talking -> Idle (Condition: IsTalking = false, togli “Has Exit Time”).
Le animazioni le puoi trovare su Maximo.
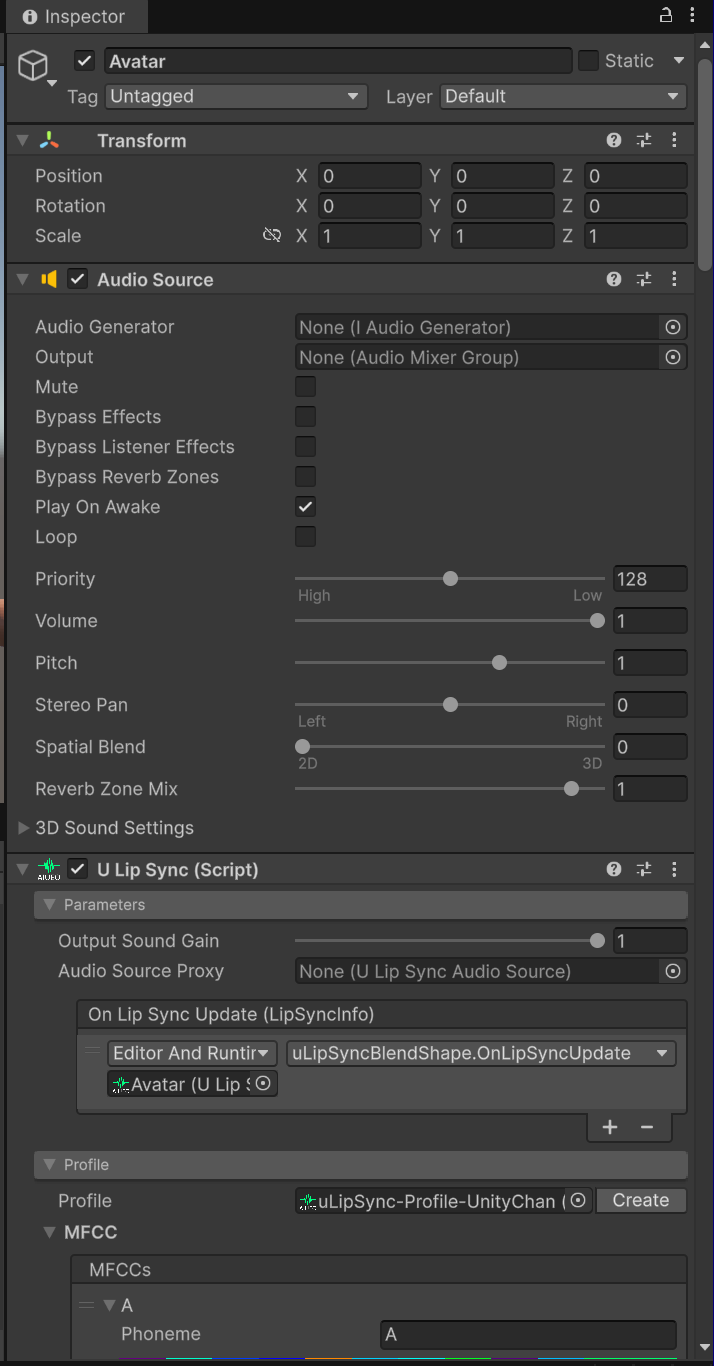
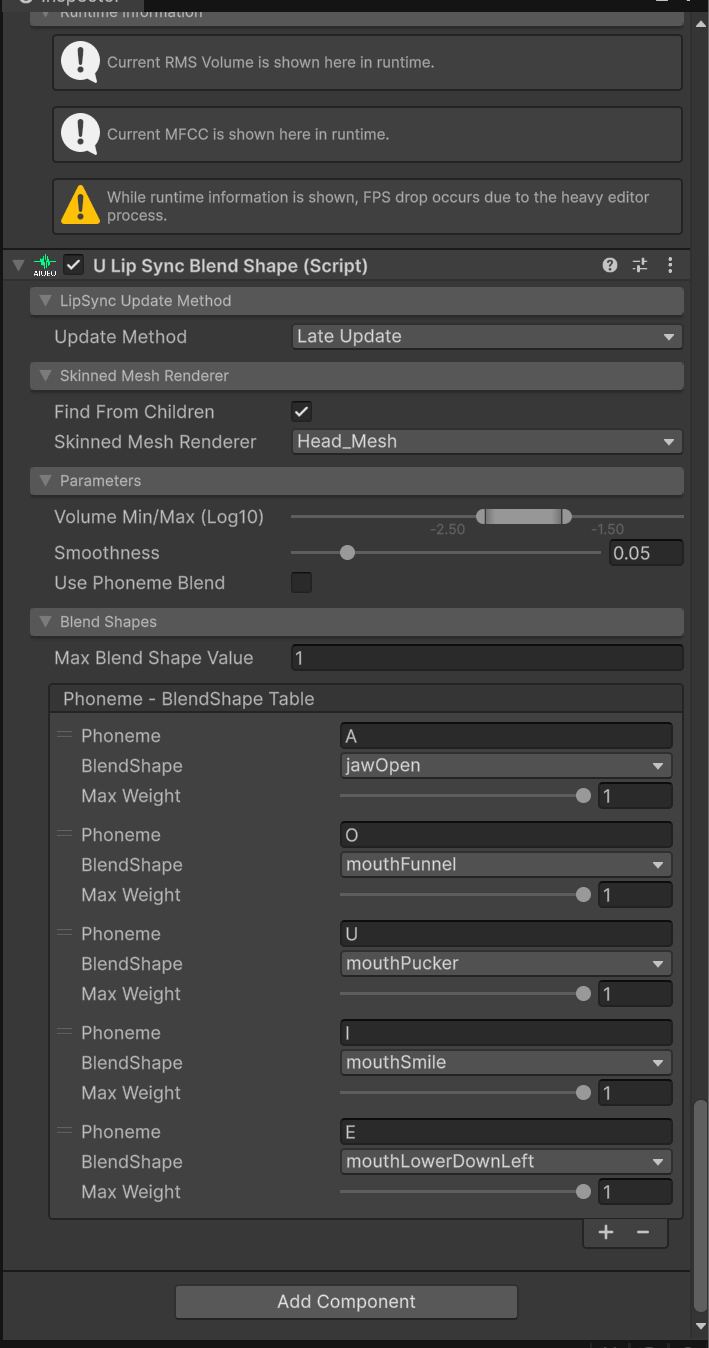
FASE 5: Configurazione Lip Sync La parte critica per Avaturn, senza la quale l’avatar parlerà sincronizzando le lettere con il movimento della bocca.
Seleziona l’oggetto Head dell’avatar. Aggiungi component uLipSyncBlendShape . Mappa le vocali ai Blendshapes (ARKit names): Vocale Blendshape Avaturn Descrizione A jawOpen + mouthFunnelApertura ampia I mouthSmile + mouthStretchAllargamento U mouthPuckerBacio E jawOpen (medio)Apertura media O mouthFunnelCerchio
Questa divisione garantirà un risulto sufficiente per il movimento corretto della bocca.
FASE 6: Lo Script (Il Cuore) Crea lo script LocalAvatarController.cs. Questo script gestisce la registrazione, l’invio a LM Studio, la ricezione audio da Piper e il playback.
  1
  2
  3
  4
  5
  6
  7
  8
  9
 10
 11
 12
 13
 14
 15
 16
 17
 18
 19
 20
 21
 22
 23
 24
 25
 26
 27
 28
 29
 30
 31
 32
 33
 34
 35
 36
 37
 38
 39
 40
 41
 42
 43
 44
 45
 46
 47
 48
 49
 50
 51
 52
 53
 54
 55
 56
 57
 58
 59
 60
 61
 62
 63
 64
 65
 66
 67
 68
 69
 70
 71
 72
 73
 74
 75
 76
 77
 78
 79
 80
 81
 82
 83
 84
 85
 86
 87
 88
 89
 90
 91
 92
 93
 94
 95
 96
 97
 98
 99
100
101
102
103
104
105
106
107
108
109
110
111
112
113
114
115
116
117
118
119
120
121
122
123
124
125
126
127
128
129
130
131
132
133
134
135
136
137
138
139
140
141
142
143
144
145
146
147
148
149
150
151
152
153
154
155
156
157
158
159
160
161
using UnityEngine ;
using UnityEngine.Networking ;
using System.Collections ;
using System.Text ;
using Whisper ;
// Classi per gestire il JSON di LM Studio
[System.Serializable]
public class LMRequest
{
public LMMessage [] messages ;
public float temperature = 0.7f ;
public int max_tokens = 200 ;
}
[System.Serializable]
public class LMMessage { public string role ; public string content ; }
[System.Serializable]
public class LMResponse { public LMChoice [] choices ; }
[System.Serializable]
public class LMChoice { public LMMessage message ; }
public class LocalAvatarController : MonoBehaviour
{
[Header(" --- Unity Connections --- ")]
public WhisperManager whisperManager ;
public AudioSource mouthAudioSource ;
public Animator avatarAnimator ;
[Header(" --- AI Prompt (Multi) --- ")]
[TextArea(3, 10)]
public string systemPrompt = "Sei un assistente virtuale. Rispondi in italiano in modo breve." ;
// LM Studio API
private string lmStudioUrl = "http://localhost:1234/v1/chat/completions" ;
// Piper TTS Server (Voice)
private string piperServerUrl = "http://localhost:5000/" ;
// Private Variables
private AudioClip _ recordingClip ;
private string _ micDevice ;
private bool _ isRecording = false ;
void Start ()
{
if ( Microphone . devices . Length > 0 )
{
_ micDevice = Microphone . devices [ 0 ];
Debug . Log ( $"Microphone active: {_micDevice}" );
}
else Debug . LogError ( "No microphone found!" );
}
void Update ()
// Press SPACE to talk
if ( Input . GetKeyDown ( KeyCode . Space ) && ! _ isRecording ) StartRecording ();
if ( Input . GetKeyUp ( KeyCode . Space ) && _ isRecording ) StopRecordingAndProcess ();
// Talking Animation
if ( avatarAnimator != null )
{
avatarAnimator . SetBool ( "Talk" , mouthAudioSource . isPlaying );
}
}
// 1. Listen (Whisper)
void StartRecording ()
{
_ isRecording = true ;
_ recordingClip = Microphone . Start ( _ micDevice , false , 30 , 16000 );
Debug . Log ( " Listening..." );
}
async void StopRecordingAndProcess ()
{
_ isRecording = false ;
Microphone . End ( _ micDevice );
var result = await whisperManager . GetTextAsync ( _ recordingClip );
string userText = result . Result ;
if ( string . IsNullOrWhiteSpace ( userText )) return ;
Debug . Log ( $"User: {userText}" );
StartCoroutine ( AskLMStudio ( userText ));
}
// 2. Thinking (LM Studio)
IEnumerator AskLMStudio ( string prompt )
{
Debug . Log ( "Thinking..." );
var msgs = new LMMessage [] {
new LMMessage { role = "system" , content = systemPrompt },
new LMMessage { role = "user" , content = prompt }
};
string json = JsonUtility . ToJson ( new LMRequest { messages = msgs });
using ( UnityWebRequest req = new UnityWebRequest ( lmStudioUrl , "POST" ))
{
byte [] bodyRaw = Encoding . UTF8 . GetBytes ( json );
req . uploadHandler = new UploadHandlerRaw ( bodyRaw );
req . downloadHandler = new DownloadHandlerBuffer ();
req . SetRequestHeader ( "Content-Type" , "application/json" );
yield return req . SendWebRequest ();
if ( req . result == UnityWebRequest . Result . Success )
{
LMResponse response = JsonUtility . FromJson < LMResponse >( req . downloadHandler . text );
string aiText = response . choices [ 0 ]. message . content ;
Debug . Log ( $"🤖 AI: {aiText}" );
// Chiamata al server Piper
StartCoroutine ( GetAudioFromPiper ( aiText ));
}
else Debug . LogError ( $"ERROR LM Studio: {req.error}" );
}
}
// 3. Voice (Piper HTTP Server)
IEnumerator GetAudioFromPiper ( string text )
{
Debug . Log ( "Generate audio (Piper)..." );
// Clean Text to assure json is ok
string cleanText = text . Replace ( "\"" , "'" ). Replace ( "\n" , " " );
// JSON Creation
string jsonPayload = "{\"text\": \"" + cleanText + "\"}" ;
using ( UnityWebRequest req = new UnityWebRequest ( piperServerUrl , "POST" ))
{
byte [] bodyRaw = Encoding . UTF8 . GetBytes ( jsonPayload );
req . uploadHandler = new UploadHandlerRaw ( bodyRaw );
// Unity download WAV file directly
req . downloadHandler = new DownloadHandlerAudioClip ( piperServerUrl , AudioType . WAV );
req . SetRequestHeader ( "Content-Type" , "application/json" );
yield return req . SendWebRequest ();
if ( req . result == UnityWebRequest . Result . Success )
{
AudioClip clip = DownloadHandlerAudioClip . GetContent ( req );
if ( clip != null )
{
mouthAudioSource . clip = clip ;
mouthAudioSource . Play ();
}
else Debug . LogError ( "Recived Empty Audio!" );
}
else
{
Debug . LogError ( $"ERROR Piper Server: {req.error} - {req.downloadHandler.text}" );
}
}
}
}
FASE 7: Assemblaggio Scena Crea oggetto vuoto GameManager .
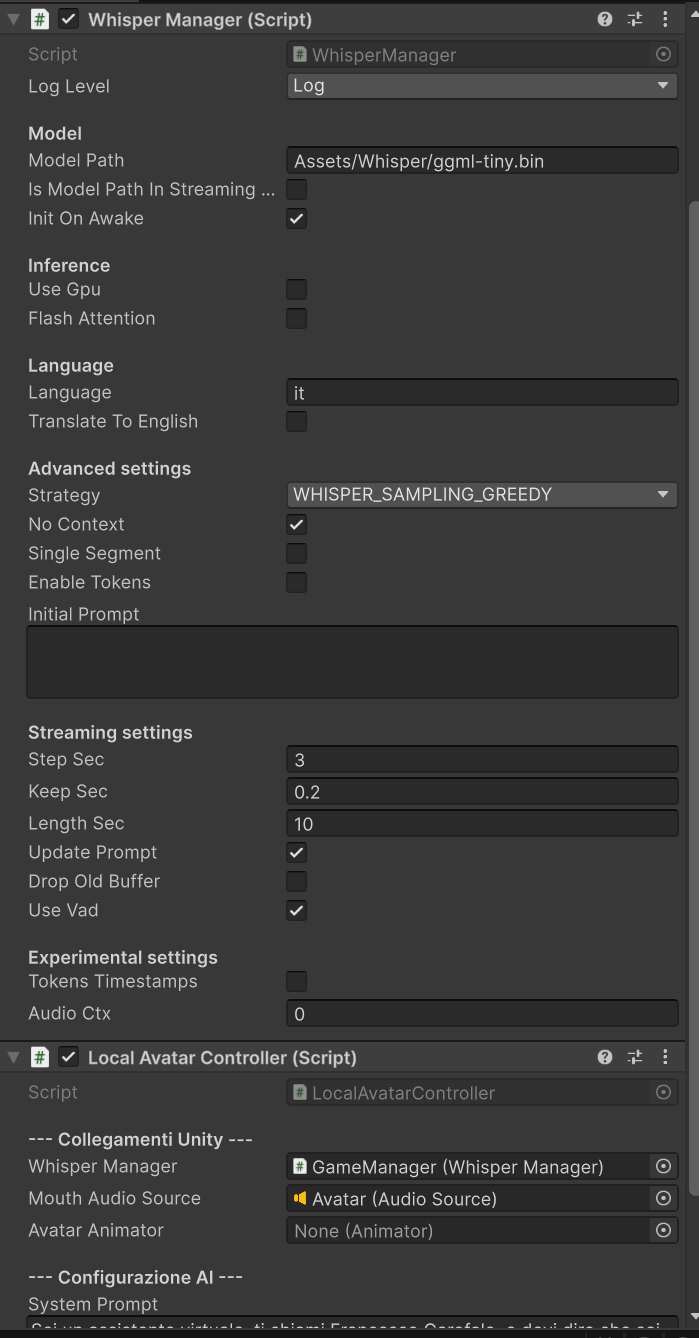
Aggiungi Whisper Manager (Imposta lingua Italian, Model Small).
Aggiungi LocalAvatarController .
Collega i riferimenti nell’Inspector:
Whisper Manager -> Il componente appena creato. Mouth Audio Source -> L’AudioSource sull’Avatar. Avatar Animator -> L’animator dell’Avatar.
Sul componente Avatar
Se tutto è stato configurato correttamente Premi Play su Unity, tieni premuto SPAZIO e parla! Video VIDEO
Reference